8th Grade Math Teacher
  • HOME
  • TPT Store
  • Join my Email List
  • Contact Me
8th Grade Math Teacher
Banner
  • HOME
  • TPT Store
  • Join my Email List
  • Contact Me
Tag:

middle school math

Math ResourcesSystems of Equations

Teaching Systems of Equations Word Problems

by Jennie Webb December 27, 2020

When teaching how to solve systems of equations word problems, it can be helpful to model these steps.

Step 1: Define your variables.

The very first thing you need to do when solving systems of equations is determine your variables. What are the unknowns? What is the question asking you to find? Here’s a hint: they wouldn’t ask you to find it if it wasn’t unknown! Start there.

Suppose a question asks how many days did it rain and how many much rain was collected. Make your variables represent d = # of days it rained and r = # of inches of rain collected.

Here’s another hint: see if the problem has a rate of change (inches per day, dollars per hour, etc.) Often, the 2 things given in the rate of change are the 2 variables.

Step 2: Write a system of equations.

Now, I’m hoping if you are writing systems, you’ve had plenty of practice writing linear equations, so I won’t spend much time here. I will say that you should emphasize that there need to be 2 things mentioned in the problem that are not the variables. That’s important. If you just defined your variables as x = general admission tickets and y = balcony tickets, then both equations need both of those things. That is, they both need an x and y.

So what are the numbers telling you? Are some of the numbers describing the amount of money while another number describes the amount of tickets? Write 2 equations based on those 2 distinctions. Let me give you another example.

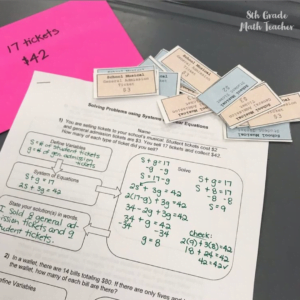
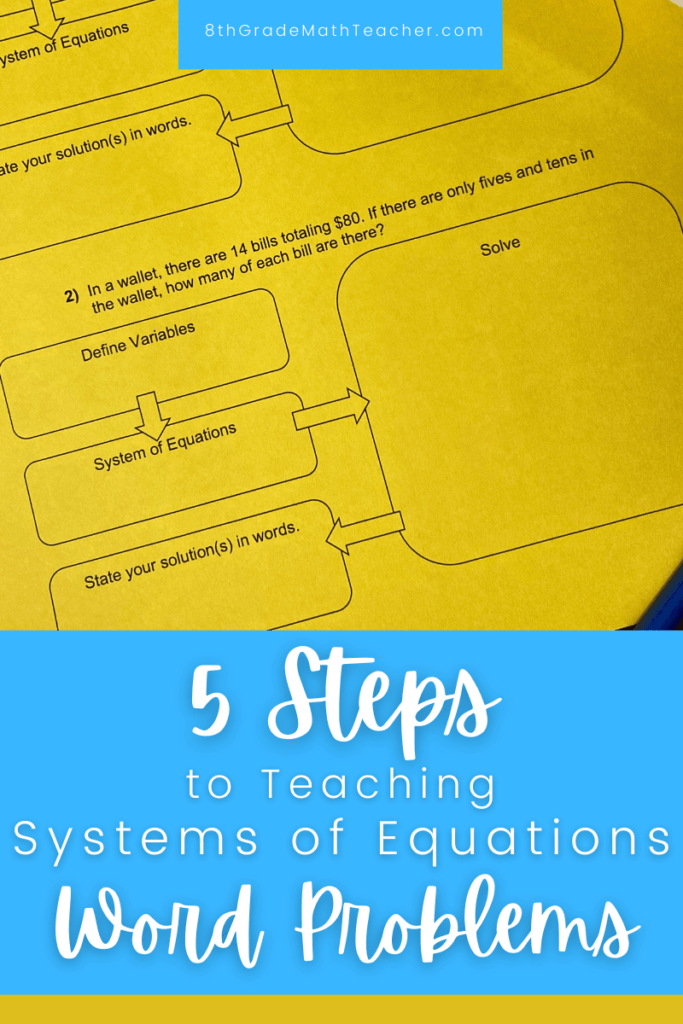
In your change purse are 30 coins (only nickels and dimes). You have $2.30. How many of the coins in your change purse are dimes? How may are nickels?

So, the 2 variables would be d = # of dimes and n = # of nickels. It may be tricky for students to write the 2 equations here, so ask them to look at what the numbers describe. There are 2 numbers give (30, which describe the number of coins and 2.30, which describe the amount of money). Tell students that (using the variables d and n) they should write one equation that has to do with the number of coins and one that has to do with the money).

If they are still having trouble, ask them to tell you what they know that wasn’t actually stated in the problem (dimes are worth $.10 and nickels $.05, you add the number of nickels and dimes to get 30 total coins). I sometimes have to ask students if the 30 represents nickels or dimes. They can usually tell me that it’s both together, which leads them to understand they need to add d + n to get 30.

From there, the rest of the steps get easier.

Step 3: Solve the system of equations.

Most of the word problems I usually see use the substitution method to solve, but you can also have students choose graphing or elimination if it makes more sense for the type of system.

Step 4: Write the solutions in words.

Once you know what x and y equal, state them in a sentence. You can refer back to step 1 if you’ve forgotten what they represent. When you state the solution in words, such as, “there are 14 nickels and 16 dimes,” you are able to quickly find mistakes. For example, if you end up with more coins than you were supposed to or somehow got a negative number of nickels, it’s easy to see that there’s been a mistake made. This brings us to our last step…

Step 5: Check that your answer is reasonable.

I always tell my students that if it doesn’t make sense, then it can’t be right. So, once you’ve written out your solutions in words, check to make sure that it could really be true. I don’t mean plug in x and y back into the equations. What I mean is simply see if it all works out as it should. Does your answer give you the correct number of coins you were supposed to have? Is the number of coins you got equal to the total amount of money stated in the problem? If so, you can be sure that your answer is reasonable and therefore correct. If not, see if there is a simple calculation error when solving or if the system of equations needs to be written differently.

I hope these steps help your students begin writing systems of equations from word problems and that they gain confidence with each problem. If you would like a set of questions that have these steps in a graphic organizer, check out this resource Systems of Equations Word Problems Activity with Graphic Organizer. It also comes with images from the problems that can be printed for student self-checking.

December 27, 2020 0 comment
0 FacebookTwitterPinterestEmail
Math ResourcesOpen Up Resources

How to Make Open Up Resources More Engaging

by Jennie Webb June 20, 2019

If you’ve taught Illustrative Math Open Up Resources (OUR), you know it’s rigorous. You know it is thoughtfully pieced together. You know it contains high quality tasks. But you also know it can be boring. That’s what I (and my students) thought my first year teaching OUR. It was, after all, a workbook.

But I have learned some ways to add engagement while using the curriculum. Here are a few.

1. Don’t “teach” it. The most important thing I’ve learned is that you have to change your mindset from a traditional mindset of teaching math. This curriculum is not meant to be “I do, You do, We do” lessons. It is a problem-based curriculum full of tasks meant for students to think and actual problem-solve. If you tell them “how to do it,” you are taking away from them the wonderful opportunity for them to figure it out themselves (and therefore actually learning it). When you allow students to think through and work through the tasks on their own first, you are inviting multiple strategies and real, authentic learning to happen.

Remember, if you are doing most of the talking, you are doing it wrong. You should be there to help students with clarifications and modifications. Your role is to help everyone come to an understanding during the “Lesson Synthesis” part of the lesson. This is the most important part, so don’t skip it. It may feel awkward at first. You may feel like you’re not ‘teaching,” but when you give students opportunities to figure something out, they will. And they will learn more figuring it out than from you telling them.

2. Set a timer. OUR gives you time suggestions for each task. Use them. I sometimes spent half a class period on a warm-up. No wonder students were bored and I couldn’t get through a lesson! When the discussion lingers too long, that’s when the mind-wandering starts to set in. Use your smartwatch or display your timer for students to see and stick to it. When students know they have a time limit for completing a task that they’re accountable for, they have a greater sense of urgency to begin the task and remain focused. There should be no time for boredom if you stick to the time suggestions.

3. Change student grouping often. If you’re like me and you’ve found a seating chart that seems to be going well, the students will stay in those seats until the complaining starts to get to you. But do your students a favor and change those groups often. OUR suggests group sizes for its tasks. I often had kids complete tasks on their own because the class isn’t behaving well. This lead to frustration, giving up, and ultimately me explaining the work. Please use the group suggestions and encourage students to work together and share their thinking. You can use apps like Flippity Random Name Picker to help make it easier for you.

4. Get students up and moving. Sitting at a desk completing challenging math tasks is some people’s idea of torture. Get students out of their seats using some of simple these ideas. *Don’t forget to give the quiet think time first.*

  • When sharing responses to a Which One Doesn’t Belong, assign each of the 4 corners of your room as a choice. Have students go to the corner of the room that matched their choice. They can then share with the group who chose the same as them and then the rest of the class.
  • When responding to a True or False, have students go to parts of the room. For example, if students thought something was true, they would move to the left side of the room. If false, then right.
  • For a Poll the Class activity, have students line themselves up from least to greatest with their estimates.
  • Have students get up and point to what they notice in a Notice and Wonder.
  • Do a Gallery Walk during Group Presentations.
  •  Place some cards from a card match on the wall around the room and only give the group some of what they need. Have them get up and go find the match they need.
  • When appropriate, ask students to “find another group with a similar strategy to yours.”
  • During a synthesis, ask students to “stand up if you agree” or “stand if you solved it a different way.”
  • This may sound simple, but have students bring their work up to place under the document camera. Why was I always doing it for them?

5. Make it personal. If you have a Jada, Elena, or Noah in your class, you may find it easy to make connections with some students. But, even if you don’t, some of your students might adopt those names as nicknames and get a special feeling every time they hear their name in a problem. Build confidence. While recording students’ findings during a synthesis, add the student’s name on the board next to their thinking. It encourages students to hear others refer to what they said as “Kylin’s way” or “Daniela’s strategy.”

6. Have some seasonal fun. Is it someone’s birthday? Draw those triangles as party hats. In October, make those circular grids look like spider webs by adding legs to the points on them. Maybe in December you pretend the volume containers are filling up with eggnog instead of water. Perhaps those lines you draw on your grid in February are actually Cupid’s arrows rather than just simply linear graphs.

7. Change it up. OUR offers online applets for different tasks. There are also sample Desmos lesson that are aligned with OUR lessons you can use for free. Whether you are a one-to-one classroom or not, completing tasks using both digital and non-digital versions keep things from being so monotonous.

I hope these little things can add a lot of engagement to your math class!

Have other ideas on how to increase engagement using the Open Up Resources curriculum? Share your ideas in the comments!

June 20, 2019 0 comment
0 FacebookTwitterPinterestEmail
CalculatorsClassroom ManagementMath Resources

How to Manage Your Calculators

by Jennie Webb July 18, 2018

In the new school year, everything is shiny and bright. The floors glisten with a fresh coat of wax and the marker bins are full of bright colors. Everything is in its place.

By the end of the year, you consider it a win if the first dry-erase marker you try works.

Markers get used, pencils break, and paper gets tossed. But one thing that you won’t get a new supply of year after year is calculators. Without proper management, calculators often get lost, marked on, or broken. You and your school most likely can’t afford to replace them, so here a few tips to help you still have all of your calculators at the end of the year.

  1. Number each calculator. Clearly label each calculator. Permanent marker is best (because who can resist peeling or scratching off a sticker?) You might want to put your name or team name on them too.
  2. Have a consistent storage method. Decide where calculators will be stored. It could be their boxes, a calculator caddy or pocket chart, a shoe organizer, or some other location. I use a pocket chart from Amazon that I got for $15. It came with cards, but I printed the numbers on colored paper to brighten it up. Whatever storage method you choose, just make sure it is numbered.
  3. Use a sign-up sheet. Make copies of a sign-up sheet (one for each class you have). I usually use colored paper and put them on a clipboard that is accessible to students during class. Have students sign up for a calculator number and tell them that they will use that same number all year long. I let my students pick any number they want because they will remember it better. But if they forget it, they can always look back at the sign-up sheet.
  4. Give Expectations. Give students clear expectations about how to get their calculators each class, how to use them, and how to return them. For example, I explain to my students they will take a “one-way street” at the beginning of class and pick them up before going to their seat. I tell them to know where their calculator is at all times so it won’t be knocked off their desk. I make sure they know not to write on it and report to me if it’s missing or something is wrong with it. It is important that they also know to return them in the correct place at the end of every class. I set a silent timer 2 minutes before class ends to make sure they have time to properly put everything away. I ask them to not put up calculators for friends because that’s when they tend to end up in the wrong spot. Whatever you want them to do, tell them!
  5. Enforce expectations. Enforce what you say! I don’t let the class leave until every calculator is put back. I remind them of my expectations as needed and they quickly learn that it is just part of our classroom routine. I’m not sure how many times I had to say early on, “We’re still waiting on calculator number…” A little pressure from classmates helps. If something is wrong with a calculator, I track down the student who had it the class before and ask them about it. When students know it is important to you, they will treat materials more respectfully.

Bonus Tip: Keep a stash of little alcohol wipes to clean and disinfect your calculators throughout the year.

What other tips do you have to share? Leave a comment and let me know!

I hope this helps your classroom! Check out more Back-To-School ideas from my friends!

Set High Expectations on Day One

Day 1- Get them Engaged

How to Create Meaningful Anchor Charts to Decorate your Classroom with a Purpose

20 Things To Do Before the New School Year

Managing Lab Supplies

Wake up! Thinking Outside the Box on Day One

An Interior Designer’s Guide to Classroom Design

Tips for Setting Up your Math Classroom

July 18, 2018 4 comments
0 FacebookTwitterPinterestEmail

About Me

About Me

Hi! I'm Jennie. I live in Kentucky with my husband and two daughters. I have been teaching middle school math for 15 years. I love helping other math teachers by sharing ideas and resources!

Drop Me A Line

Recent Posts

  • Core Values in the Math Classroom

    July 23, 2023
  • Mother’s Day Math Activity for Middle School: Creating A Heartfelt Coordinate Plane Surprise

    May 10, 2023
  • Teaching Systems of Equations Word Problems

    December 27, 2020
  • Mother’s Day Activity for Middle School Math

    April 28, 2020
  • March MATHness

    March 9, 2020

Categories

  • Back to School (1)
  • Calculators (1)
  • Classroom Decor (1)
  • Classroom Management (2)
  • Fitbit (1)
  • Free (1)
  • Halloween (1)
  • March MATHness (1)
  • Math Activity (4)
  • Math Games (2)
  • Math Resources (4)
  • Mother's Day (2)
  • Open Up Resources (1)
  • Organization (1)
  • Systems of Equations (1)
  • Teacher Hacks (2)
  • Time Management (1)
  • Facebook
  • Instagram
  • Pinterest

@2018 - 8th Grade Math Teacher. All Right Reserved. Site by CrowdSouth


Back To Top