

At back-to-school time, the shelves of many stores are packed with school supplies. The boxes used to hold all of the shiny new items are perfect for storage in your classroom! You just simply need to ask. I often go to Walmart or Staples the weekend or two before school starts and that’s when you find a lot of those boxes empty. I always need to buy something anyway, so I grab a couple empty boxes and ask if I can have them. I reinforce them/ decorate them with some tape, add some labels, and I’m done- cheap storage for my classroom!
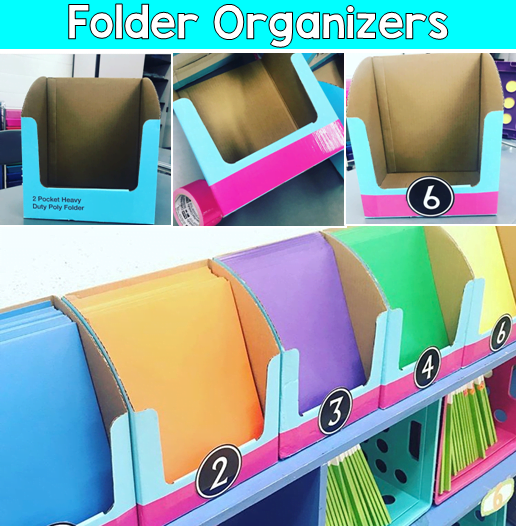
Folder/Notebook boxes. For these, you will need to get boxes used to display folders. You can get notebook boxes, but they aren’t wide enough for folders and they may not hold enough notebooks for the number that you need. The ones pictured are from Staples and I used Duck Tape to wrap around the bottom. This was to cover the writing on the box and to give the box a little more support. I have a different box for each class period, so I added a number label on the front of each one. That’s it! You can, of course, use other types of tape to decorate or none at all if your label covers the writing on the box.
I’ve used these for differentiation (leveled student work in folders) but you could use them to store Interactive Notebooks in your classroom. Currently, I have students keep their “I Can” Checklists and formative assessments in their folders. Each time they get something back, they update their checklist and staple the learning check to the back of the checklist. I have one for each unit so by the end of the year, the folder is full of all the things they have learned.
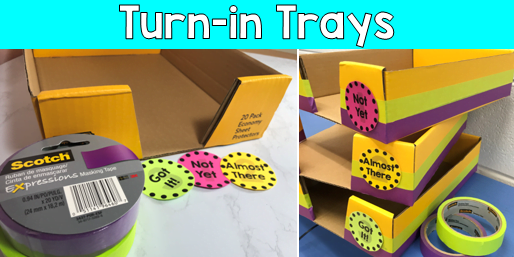
Turn-in Trays. These boxes can be found empty a lot because they are used to sell paper, dividers, sheet protectors, and other things. Follow the same instructions as before- wrap with tape and label. For these, I got the boxes from Walmart and wrapped them with masking tape. I put a post-it on top of the writing before wrapping because it showed through the lighter green color. For my turn-in trays, I wanted students to self-asses their work, so I made 3 and added these FREE Mastery Level Labels. You could also label yours by class period or however will help you to sort papers.
For a video showing how to make the turn-in trays, check out my Instagram stories Organization highlight.
Stay organized and do it without spending a lot of money! Let me know where you get your boxes and how they turn out!


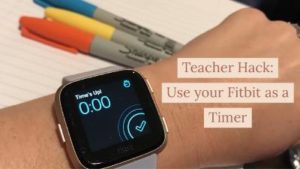 Use timers. Time can definitely get away from you in the classroom if you let it. You can also use your Fitbit to set timers throughout class. I do a lot of group work and rotations in my classroom, so using timers is helpful to keep me and my students from wasting too much time. Although sometimes a visual timer is good to keep students aware of how much time they have, a timer they can’t see if often better for smaller chunks of time. I’ve found that when students are rotating around in stations, I can’t get a feel for how long they need unless I use a timer. If I don’t time them, I’m inconsistent with how long I give them and sometimes they end up not getting finished while other times they have been finished, waiting, for several minutes. Just like with the silent timers, you’re the only one who knows when time is up, so if you see students need more time, you can always let them keep working and adjust the next timer accordingly. You can time students during bell-ringers (5 minutes), think time (2 minutes), turn and talk time (2 minutes), group work (10 minutes), transitions (1 minute), clean up time (1 minute), independent work (15 minutes), and more. The more aware of time you are, the less distractions can steal your precious class time from you.